
PS2 BIOS Download Complete Guide to PlayStation 2 BIOS, PCSX2 Setup & Troubleshooting
A PS2 BIOS is the firmware a PlayStation 2 console uses to initialize its hardware and provide the system-level environment that games depend on. Emulators such as PCSX2 recreate the console’s hardware, but they can’t recreate this firmware, so PCSX2 requires a BIOS from a real PlayStation 2 rather than an open-source replacement. Without one, you’ll see the familiar “BIOS not found” error and no game will boot.The BIOS is proprietary Sony firmware, and it isn’t one-size-fits-all. Consoles were sold in different regions (NTSC-U, NTSC-J, and PAL), and each regional BIOS works best with games from the same region.This guide covers what the BIOS does, how to dump it legally from your own console, which version to choose, how to set it up in PCSX2 and other emulators, and how to fix common BIOS errors.
What Is a PS2 BIOS? What Does BIOS Mean
BIOS stands for Basic Input/Output System. In simple terms, it’s the first software that runs when a device powers on, and it gets the hardware ready before anything else can load. It’s a type of firmware: system software stored on a chip inside the device rather than on a disc or hard drive.
On the PlayStation 2, the BIOS is Sony’s built-in system software. It lives on a chip on the console’s motherboard and runs every time you press the power button. Its job is hardware initialization, and it finishes before any game gets a chance to run.
What the PS2 BIOS Actually Does
The PS2 BIOS handles far more than startup. It manages most of the console environment you interact with:
- Hardware initialization: Starts the Emotion Engine (CPU), Graphics Synthesizer (GPU), SPU2 (audio) and I/O processor.
- Region and disc check: Checks the disc region before a game is allowed to run.
- Memory cards: Reads, writes and organizes your save data.
- Controller input: Handles DualShock 2 controllers and other peripherals.
- System settings: Date, time, language, screen and audio, saved in the .nvm file.
- PS1 compatibility: Lets the console and emulator run original PlayStation games.
- DVD and CD player: Controls music CDs and DVD movies (stored in the .rom1 file).
- Error detection: Shows hardware and disc errors, including the Red Screen of Death.
Sony’s own PS2 documentation organizes the console the same way, with separate sections for system configuration, memory cards, controllers, games, and the main menu. That’s also why emulators need a BIOS: every one of these functions lives in Sony’s firmware, not in the emulator.
Is PS2 BIOS the Same as a Game ROM?
No, and mixing them up is one of the most common beginner mistakes.
- BIOS: is the console’s firmware. One BIOS file runs every game
- A game image: is a copy of a single game disc. For PS2 games it’s usually an ISO file (sometimes CHD or CSO). You need a separate image for each game.
- ROM: technically means read-only memory. The BIOS is stored on a ROM chip, which is why BIOS dumps are sometimes called “BIOS ROMs.” In emulation slang, though, “ROM” usually means game files, a habit carried over from cartridge consoles.
| PS2 BIOS | PS2 Game Image | |
|---|---|---|
| What it is | Console firmware | Copy of one game disc |
| File type | .bin (about 4 MB) | .iso, .chd, .cso (up to several GB) |
| How many you need | One (ideally per region) | One per game |
| Where it goes | Emulator’s BIOS folder | Your game library folder |
The emulator needs both: the BIOS to act as the console, and a game image to act as the disc in the tray. Renaming an ISO won’t turn it into a BIOS, and a BIOS file can’t be “played” on its own.
Why Does PCSX2 Need a PS2 BIOS?
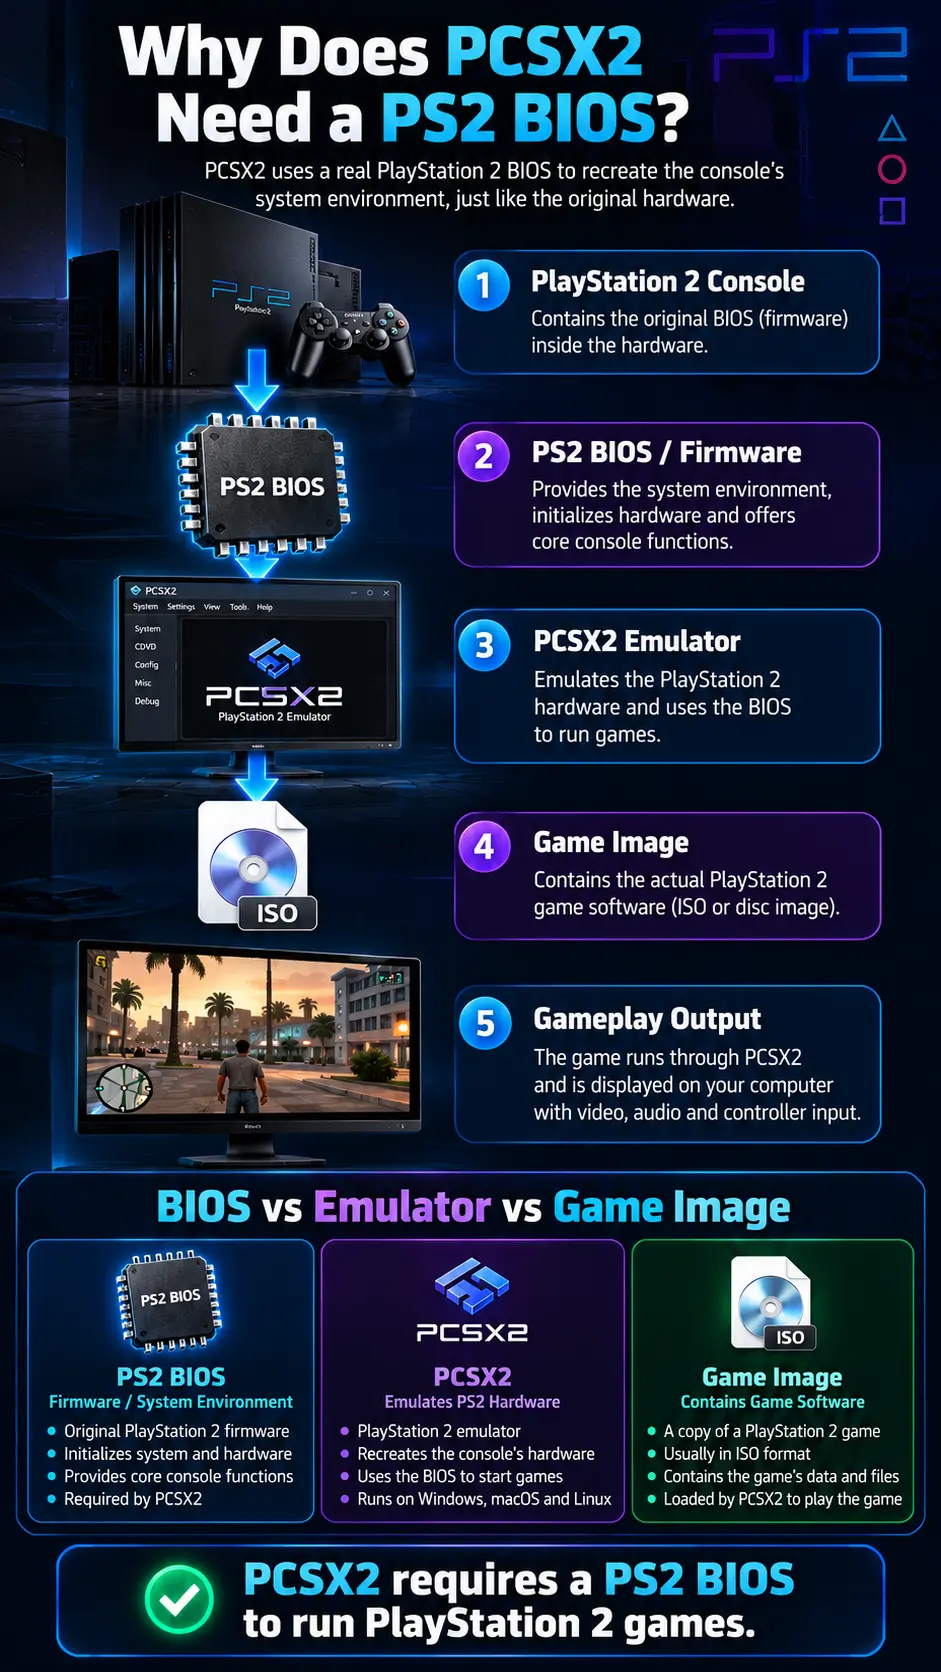
PCSX2 needs a PS2 BIOS because it emulates the PlayStation 2’s hardware but not Sony’s firmware. The official PCSX2 documentation states that the emulator cannot play games without a BIOS, and that the BIOS must be dumped from your own console. Without it, PCSX2 has no system software to start, which is why so many new users run into the “BIOS not found” message.
APK How to Download
PCSX2 is a PS2 emulator. It uses emulation to recreate the console’s hardware in software: the Emotion Engine CPU, the Graphics Synthesizer GPU, the I/O Processor, and the sound hardware. What it can’t legally include is the copyrighted firmware that originally ran on that hardware.Here’s what happens when you boot a game:
PCSX2 loads your BIOS image
(the .bin file you dumped) into its virtual memory, in the same place a real PlayStation 2 reads it from its ROM chip.
The BIOS performs system initialization
It sets up the emulated hardware, reads system settings such as language and clock, and prepares the environment games expect.
The BIOS reads the game image
and hands control to the game
While you play
the game keeps calling BIOS routines for memory card saves, controller input, and disc access, and PCSX2 runs them just as a real console would.
In short, PCSX2 provides the machine, and the BIOS provides the operating environment.
BIOS vs Emulator: What’s the Difference?
PS2 emulation works as a stack of parts, each with its own job:
Component
- ✓PS2 BIOS
- ✓PCSX2
- ✓Game image
- ✓Controller
- ✓Graphics API
Purpose
- ✗Provides console firmware and the system environment
- ✗Emulates PS2 hardware (CPU, GPU, sound, I/O)
- ✗Contains the game software (usually an ISO or CHD file)
- ✗Provides player input, mapped to DualShock 2 buttons
- ✗Handles rendering (Vulkan, Direct3D 11/12, OpenGL, or Metal)
Can PCSX2 Work Without a BIOS?
No. According to the current official PCSX2 documentation, PCSX2 cannot boot games without a PS2 BIOS, and there’s no built-in bypass or open-source substitute. Fast Boot only skips the startup animation. The BIOS is still loaded and used in the background.
If you don’t have a BIOS yet, you have two options. You can dump one from your own PlayStation 2 (explained in the next section), or you can try Play!, a separate emulator that uses high-level emulation to run some games without a BIOS, at lower compatibility than PCSX2.
🌍 Regions
Regions Explained
Sony sold the PlayStation 2 in different markets with different hardware configurations, TV standards, and region locks. Each console’s BIOS was built for its market, so a BIOS dumped from a Japanese console isn’t identical to one from a European or North American unit. Understanding these regions is the key to choosing the right BIOS for your games.
NTSC-U BIOS
NTSC-U refers to PS2 consoles sold in North America, mainly the USA and Canada. The “NTSC” part comes from the analog TV standard used in those countries, which runs at 60 Hz.
An NTSC-U regional BIOS comes from a North American console, which you can identify by its SCPH model number. Most North American models end in -01 (for example, SCPH-30001 or SCPH-39001), though some later slim revisions use different suffixes, such as SCPH-70012. NTSC-U is the most common BIOS region in the emulation community, largely because the North American game library is so large and so many English-language rel
NTSC-J BIOS
NTSC-J refers to consoles sold in Japan, where the PlayStation 2 launched first in March 2000. Like North America, Japan uses a 60 Hz NTSC TV standard, but Japanese consoles and games have their own region lock.
A Japanese PlayStation 2 usually has an SCPH model number ending in -00, such as SCPH-10000, SCPH-30000, or SCPH-70000. The earliest Japanese models are historically interesting: the original SCPH-10000 was the very first PS2 released anywhere. An NTSC-J BIOS is the natural match for Japan-only releases and for the original Japanese versions of games that were later localized.
Model numbers
- MODEL-100
Region C · 50 Hz
PAL BIOS
PAL consoles were sold in Europe, Australia, and other markets that used the PAL TV standard, which runs at 50 Hz with a higher vertical resolution (576i instead of 480i).
A European PS2 or Australian unit usually has an SCPH model number ending in -02, -03, or -04, depending on the specific market (for example, SCPH-30004 or SCPH-50004). PAL BIOS files also support more system languages than NTSC ones. That matters because many multi-language PAL games pick their in-game language from the console’s system settings.
Model numbers
- MODEL-200
NEW · Tag
NTSC-C and Other Regional Variants
Beyond the three main regions, Sony produced consoles for other markets, including models for mainland China, Hong Kong, Taiwan, and South Korea. Emulation tools and communities sometimes label the Chinese variant NTSC-C, but naming isn’t fully consistent across sources, and these regions are far less documented than NTSC-U, NTSC-J, and PAL.
The practical advice is simple: don’t rely on a label alone. Check your console’s SCPH model number against a reliable model database, and check what region PCSX2 reports when it detects the BIOS file. Japan-only devices such as the PSX (a DVR with PS2 functionality) also have their own firmware variants.
Model numbers
- MODEL-001
Does BIOS Region Matter?
Yes, but it’s better understood as a chain than as a single rule:
| Region | Common designation | What it represents | Related terminology |
|---|---|---|---|
| North America | NTSC-U | North American PS2 systems | USA, NTSC |
| Japan | NTSC-J | Japanese PS2 systems | Japan, NTSC |
| Europe | PAL | European PS2 systems | Europe, PAL |
| Other regional variants | Varies | Other market configurations | SCPH/model information |
Does the Region Matter?
Yes, but it’s better understood as a chain than as a single rule:
- Console region determines which BIOS the console shipped with. A US console contains an NTSC-U BIOS.
- BIOS region sets the system environment: the region lock, available system languages, and default video standard.
- Game region defines what the game expects. A PAL game may run at 50 Hz and read the system language, while an NTSC-J game may expect Japanese system settings.
- Emulator configuration is where you bring these together. PCSX2 lets you store several BIOS files and choose which one to use.
- Compatibility considerations are the result. When the BIOS and game regions match, you get the behavior the developers tested for.
On a real PS2, a mismatch usually means the disc won’t boot at all. PCSX2 is more forgiving and can often run games from other regions. Even so, a matching BIOS is still the safest choice, because it avoids language problems, 50/60 Hz timing quirks, and occasional title-specific issues.
The simple rule
Match your BIOS region to your game region whenever you can. If you play games from several regions, keep one BIOS per region in your PCSX2 BIOS folder and switch as needed.
What Is SCPH and Why Does It Matter?
Flip over almost any PlayStation 2 and you’ll find a model number starting with SCPH. That short code tells you more about your console than any other label on it, including which BIOS it contains.
What Does SCPH Mean?
SCPH is the prefix Sony used for PlayStation consoles and accessories, starting with the original PlayStation (which used models like SCPH-1001). It’s commonly said to stand for “Sony Computer Peripheral Hardware,” but Sony has never officially confirmed that. For practical purposes, just treat SCPH as Sony’s hardware model prefix.
On the PS2, the SCPH number is printed on the label on the bottom or back of the console. It’s also the most reliable way to identify which firmware environment your console has, because the BIOS was tied to the hardware model and market it shipped in.
How PS2 Model Numbers Identify Hardware
A PS2 model number generally has two parts:
SCPH-[series][region]
- The series (the first digits, such as 10000, 30000, 50000, or 70000) indicates the hardware generation. The PS2 went through many internal revisions between 2000 and 2013, and each generation shipped with its own BIOS version. Models in the 70000 range and above are the slim consoles. Lower numbers are the original fat design.
- The last two digits usually indicate the market. As a common rule of thumb, -00 is Japan, -01 is North America, and -02, -03, and -04 are PAL markets. There are exceptions, especially among later slim models, so treat this as a guide rather than a strict rule.
Together, those two parts tell you three useful things: whether the console is fat or slim, which region it was sold for, and roughly which BIOS generation it runs. The model can also affect how you dump the BIOS, since homebrew methods like FreeMcBoot, FreeDVDBoot, and OpenTuna each work on specific models and revisions.
Examples of PS2 SCPH Model Numbers
| SCPH-10000 | Early fat model, Japan (-00). The first PS2 generation. |
|---|---|
| SCPH-18000 | Early fat model, Japan (-00), later revision |
| SCPH-39001 | Fat model, North America (-01) |
| SCPH-50003 | Later fat model, PAL market (-03) |
| SCPH-70000 | Slim model, Japan (-00) |
| SCPH-75004 | Later slim revision, PAL market (-04) |
Rather than memorizing a long list, it’s more useful to read the pattern. Then confirm your exact console in two ways:
- On a real PS2: Press Triangle on the main menu (the Browser screen) to open Version Information, which shows the system software versions installed.
- In PCSX2: After you add your dumped file, the BIOS settings list shows the detected region and BIOS version, so you can confirm what you’ve got.
Knowing your SCPH number means you can choose the right dumping method, understand your BIOS region, and troubleshoot with accurate information instead of guesswork.
📁 PS2 BIOS Files
PS2 BIOS File Types and Components Explained
When you dump a PS2 BIOS, you usually don’t get a single file. You get a small set of files, each holding a different part of the console’s firmware or configuration. Most guides skip over them, but understanding them makes troubleshooting much easier.
Main firmware · ~4 MB
BIOS Image
The main firmware file — the core system software that boots the console and provides the environment games run in. It’s the file PCSX2 lists when you open its BIOS settings.
Depending on the dumping tool, it appears as a .bin file or as the ROM0 file. In most cases both hold the same data: the console’s primary boot firmware.
Seen as
- .bin
- .rom0
Why it matters: Required — PCSX2 can’t boot without it.
Main boot ROM
ROM0
The PS2’s main boot ROM, where the core BIOS lives. It contains the startup code, the kernel routines games call, and the system menu (the Browser and System Configuration).
File extension
- .rom0
Why it matters: The component PCSX2 absolutely requires. If your dump has a .rom0 file, treat it as your main BIOS image.
Additional firmware
ROM1
Holds additional firmware data. On many PS2 models it’s commonly associated with DVD playback components and other system data outside the core BIOS.
File extension
- .rom1
Why it matters: Most games don’t depend on it, but it’s part of a complete dump — keep it next to your main BIOS file.
Some models only
ROM2
Only appears on some consoles, typically certain regional models. It’s commonly linked to extra region-specific data, such as additional font support on some Asian-market consoles.
File extension
- .rom2
Why it matters: No ROM2 in your dump is normal — your console model simply doesn’t have one.
Encrypted · Some models
EROM
Often described as “encrypted ROM”, EROM contains additional system data stored in encrypted form. It’s commonly associated with DVD player functionality on later PS2 models.
File extension
- .erom
Why it matters: Not present on every model and not needed to boot most games in PCSX2.
Settings · Non-volatile memory
NVM
Non-volatile memory — configuration data the console keeps even when powered off, such as system settings and model-related information. PCSX2 uses an NVM file alongside the BIOS to store system configuration.
Some dumps also include a .mec file with data from the console’s MechaCon (mechanical controller) chip, which plays a similar supporting role.
File extensions
- .nvm
- .mec
Why it matters: If it’s missing, PCSX2 can generally create a default — but your own dumped NVM keeps your hardware’s original settings.
Why BIOS Dumps Can Contain Multiple Files
A real PS2 doesn’t store all its firmware on a single chip region. Different components live in separate memory areas, and a dumper copies each one into its own file. According to the official PCSX2 BIOS-dumping documentation, a completed dump produces files named with a prefix based on your console model and extensions such as .rom0, .rom1 and .nvm.
Which files you get depends on your console model. Early fat models, later slims and regional variants had different firmware layouts, so two valid dumps can contain different sets of files.
A missing ROM2 or EROM is normal
It doesn’t mean your dump failed — it just means your console model doesn’t have that component.
PS2 BIOS Files at a Glance
| File / component | General role | Why it matters | Needed to boot in PCSX2? |
|---|---|---|---|
| BIOS image | Main firmware environment | Required for PCSX2 | Yes |
| ROM0 | Main boot ROM / core BIOS data | Part of a console dump; usually your main BIOS image | Yes |
| ROM1 | Additional BIOS data | Often DVD-related on many models | No — but keep it |
| ROM2 | Regional / model-dependent data | Present in some systems only | No |
| EROM | Additional (encrypted) system data | Associated with some PS2 BIOS configurations | No (most games) |
| NVM | Non-volatile configuration data | Stores system-related information | Optional — PCSX2 can create a default |
Best practice
Keep every file from a dump together in the same folder, with the same filename prefix, and don’t rename or separate them. PCSX2 looks for companion files alongside the main BIOS image.
🛡️ Legal & Safe
How to Get Your Own PS2 BIOS
The PS2 BIOS is proprietary Sony firmware, and the official PCSX2 documentation is clear that it should be dumped from your own console. The good news: dumping is a one-time job. Once you have a clean dump, it works in PCSX2 and PCSX2-based emulators on every device you own.
Why BIOS Dumping Matters
Dumping means copying the firmware directly from your PlayStation 2’s chips into files. It matters for three reasons:
⚖️ Reason 1
Legality
You’re using firmware from hardware you own, rather than a copy distributed without Sony’s permission.
✅ Reason 2
Reliability
A fresh dump is complete and unmodified, and it matches your exact model and region.
💾 Reason 3
Preservation
PS2 hardware is aging. A dump safeguards your console’s firmware even if the hardware eventually fails.
PS2 BIOS Download vs BIOS Dump: What’s the Difference?
| BIOS Download | BIOS Dump | |
|---|---|---|
| Source | Third-party website | Your own PS2 console |
| Legal status | Unauthorized distribution of copyrighted firmware | Widely accepted route, recommended by PCSX2 |
| File integrity | Unknown — may be incomplete, mislabeled or bundled with malware | Complete and verifiable with hashes |
| Companion files | Often missing (ROM1, NVM, etc.) | Includes all files your model produces |
| Region / model | Whatever the site labels it | Guaranteed to match your console |
Bottom line
A download may look like a shortcut, but a dump is the version you can actually trust.
What You Need
- A PlayStation 2 — any fat or slim model
- A homebrew entry point — such as a FreeMcBoot memory card, FreeDVDBoot or OpenTuna, depending on your console’s model and revision
- A launcher — such as uLaunchELF (wLaunchELF)
- A USB flash drive — formatted as FAT32
- The BIOS dumper tool — linked in the official PCSX2 documentation
- A computer — running Windows, macOS or Linux
BIOS Dumping Overview
The exact steps vary slightly by model and tool, so follow the official PCSX2 guide for specifics. The general workflow looks like this:
- Prepare the USB drive. Format it as FAT32 and copy the BIOS dumper onto it.
- Boot into homebrew. Start your PS2 with your chosen entry point so the homebrew launcher loads.
- Run the dumper. Use the launcher to browse to the USB drive and open the dumper program.
- Dump to USB. Choose the USB drive as the destination and let the tool finish. This usually takes a few minutes.
- Wait for confirmation. Don’t power off or remove the drive until the dumper reports that it’s complete.
What you’ll get
A set of files named with a prefix based on your console model, with extensions such as .rom0, .rom1 and .nvm.
Moving the BIOS Dump to a Computer
- Copy all files together. Plug the USB drive into your computer and copy all the dumped files into one folder. Don’t rename or separate them.
- Make a backup. Keep a copy somewhere safe, such as cloud storage or a second drive.
- Place the files in your emulator’s BIOS folder. In recent PCSX2 versions, the first-run setup wizard lets you choose or open this folder directly. The default locations are usually:
- Windows:
Documents\PCSX2\bios - Linux:
~/.config/PCSX2/bios - macOS:
~/Library/Application Support/PCSX2/bios
- Windows:
- Confirm in PCSX2. Open PCSX2’s BIOS settings and check that the file appears with its detected region and version.
Checking BIOS Dump Integrity
A dump can fail silently if the USB drive was removed early or the drive has errors. The official PCSX2 documentation recommends verifying dumps with SHA-1 hashes, which work like a fingerprint for the file. Generate the hash with a built-in tool:
Windows (PowerShell)
Get-FileHash yourfile.rom0 -Algorithm SHA1macOS
shasum -a 1 yourfile.rom0Linux
sha1sum yourfile.rom0Then compare the result against the known-good hashes referenced in the PCSX2 documentation for your model. If they match, your dump is clean. If they don’t, run the dumper again — ideally with a different USB drive.
Also check the file size
The main BIOS image should be about 4 MB.
⚙️ Setup Guide
How to Set Up PS2 BIOS in PCSX2
Once you have your BIOS dump, setting it up in PCSX2 takes about five minutes. The steps below follow the current PCSX2 2.x setup flow, from installation to your first successful boot. Menu names can shift slightly between releases, so if something looks different, check the official PCSX2 setup documentation.
Step 1 of 6
Install PCSX2
Always download PCSX2 from the official website, pcsx2.net. Unofficial mirrors can bundle outdated builds or unwanted software.
🪟 Windows
Installer or portable
Choose the installer or the portable version. The portable version keeps all settings, BIOS files and memory cards inside one folder — useful for USB drives or backups.
🐧 Linux
AppImage or Flatpak
Use the AppImage, or the Flatpak version from Flathub.
🍎 macOS
macOS build
Download the macOS build and move it to your Applications folder.
System requirements
PCSX2 requires a 64-bit operating system and a reasonably modern CPU. Check the current system requirements on the official site before installing, especially on older hardware.
Step 2 of 6
Prepare Your BIOS Files
Before launching PCSX2, get your dump organized:
- One folder: put all your dumped files (for example the
.rom0,.rom1and.nvmfiles) in one folder. - Original names: keep the original filenames and prefixes. PCSX2 looks for companion files alongside the main BIOS image.
- No archives: make sure nothing is still inside a ZIP or 7z archive. PCSX2 can’t read compressed BIOS files.
- Several consoles? If you dumped BIOS files from more than one console (for example NTSC-U and PAL), keep them all in the same folder. PCSX2 lists each one separately.
Tip
Verify your dump’s SHA-1 hash before this step. Fixing a bad dump now saves a lot of troubleshooting later.
Step 3 of 6
Open the PCSX2 Setup
The first time you launch PCSX2, it opens the setup wizard, which guides you through the essential settings in order:
- Language: choose your interface language.
- BIOS Image: point PCSX2 to your BIOS and select one.
- Game Directories: tell PCSX2 where your game images are stored.
- Controller Setup: map your gamepad.
If the wizard doesn’t appear because PCSX2 was set up before, you can reach the same options later from the Settings menu.
Step 4 of 6
Select the BIOS Directory
On the BIOS page of the wizard, PCSX2 shows the folder it’s currently scanning for BIOS files. You have two options:
Easiest
Option A
Use the default folder
Click the option to open the BIOS folder, then copy your dumped files into it. The usual default locations:
Windows · Linux · macOS
- Documents\PCSX2\bios
- ~/.config/PCSX2/bios
- ~/Library/Application Support/PCSX2/bios
Option B
Use your own folder
Click Browse and select the folder where you already keep your BIOS files.
Handy if you store them in a backed-up location such as cloud storage.
Click Refresh
After adding or moving files, click Refresh so PCSX2 rescans the folder.
Step 5 of 6
Select Your BIOS
Once PCSX2 detects your files, it lists them with the filename, BIOS version and region. This is also a quick way to confirm your dump is valid — if a file doesn’t appear, PCSX2 didn’t recognize it as a BIOS image.
Choose the BIOS that matches the region of the games you play most:
| BIOS region | Use it for |
|---|---|
| NTSC-U | North American games |
| NTSC-J | Japanese games |
| PAL | European and Australian games |
You can switch BIOS files at any time under Settings → BIOS. If you play games from several regions, pick your most-used region now and change it when needed.
Step 6 of 6
Complete Initial Configuration
Finish the remaining wizard steps and fine-tune a few basics:
- Game directories: add the folder containing your game images (ISO, CHD or similar). PCSX2 scans it and shows your games in its library, with cover art if you add it.
- Controllers: PCSX2 can automatically map most modern gamepads (Xbox, PlayStation and many generic controllers) to DualShock 2 buttons. Check the mapping and adjust any buttons that feel wrong.
- Graphics renderer: Automatic is a good start. If you run into issues, try Vulkan or Direct3D on Windows, Vulkan on Linux, or Metal on macOS.
- Internal resolution: start at 2x native. Increase it only if gameplay stays smooth.
- Memory cards: PCSX2 creates virtual memory cards (
.ps2files) automatically, so your saves work right away.
Test your setup before loading a game
Use PCSX2’s option to start the BIOS on its own (in the System menu). If you see the PS2 startup sequence and the console’s main menu, your BIOS is working correctly. After that, launch a game from your library.
Want faster startups?
Enable Fast Boot in the BIOS settings. It skips the startup animation but still uses your BIOS in the background. Keep Full Boot available for troubleshooting or for games that behave differently with it.
🛠️ Troubleshooting
PS2 BIOS Troubleshooting
Most PS2 emulation problems fall into a few categories: the BIOS isn’t found, the game won’t display, performance is poor, or input doesn’t work. The key is to identify which layer the problem belongs to. Not every issue is a BIOS issue — and swapping in a random BIOS download rarely fixes anything. Often it just adds a new problem.
Find Your Problem
Use this table to find your issue, then jump to the matching section below.
| Problem | Possible cause | What to investigate |
|---|---|---|
| BIOS not detected | Wrong directory | Check the BIOS path in PCSX2 settings |
| BIOS missing | Incomplete dump | Check the dump’s contents and file sizes |
| Game won’t boot | Compatibility / configuration | Check the game’s compatibility and emulator settings |
| Black screen | Rendering / configuration issue | Check graphics settings and renderer |
| Stuttering | Performance configuration | Review emulator and hardware settings |
| Controller unavailable | Input configuration | Check input source and controller mapping |
| Configuration resets | Data / configuration location | Check where PCSX2 stores its settings |
Issue 1 of 6
PCSX2 Says BIOS Was Not Found
The “BIOS not found” message means PCSX2 looked in its BIOS folder and couldn’t find a file it recognizes. Check these causes in order:
- BIOS directory configuration. PCSX2 may be scanning a different folder from the one containing your files. Go to Settings → BIOS and check which directory is set. It’s easy to copy files into one folder while PCSX2 points to another, especially after reinstalling or switching to the portable version.
- Missing files. Confirm the files actually made it to your computer. A USB drive removed too early during copying can leave the folder empty or partially filled.
- Incorrect file placement. Files must sit directly inside the BIOS folder — not inside a subfolder or a ZIP/7z archive. Also watch for hidden extensions: Windows may show
scph39001.binwhen the real name isscph39001.bin.txt. Enable “File name extensions” in File Explorer to check. - Invalid or incomplete dump. A main BIOS image that’s much smaller than about 4 MB is almost certainly incomplete. Re-dump from your console rather than looking for a replacement file online.
- Permissions or path problems. Security software can block PCSX2 from reading certain folders. On Windows, Controlled Folder Access (part of ransomware protection) can restrict access to the Documents folder. On Linux, the Flatpak version may need permission to access folders outside its sandbox.
Quick fix for permission problems
Move the BIOS folder to a simple location such as C:\PCSX2\bios and point PCSX2 to it.
Issue 2 of 6
BIOS Does Not Appear in PCSX2
Sometimes PCSX2 is looking in the right folder, but your BIOS still isn’t listed. Work through these steps:
- Check the configured BIOS directory. Open the BIOS folder from within PCSX2’s settings so you know for sure you’re looking at the folder it scans.
- Confirm the files are present. You should see your main BIOS image (for example a
.rom0or.binfile) plus any companion files from your dump. - Check whether the dump is valid. PCSX2 only lists files it recognizes as PS2 BIOS images. Other files, such as game images or unrelated firmware, are ignored.
- Restart or rescan. Click Refresh in the BIOS settings, or close and reopen PCSX2 after adding files.
- Verify the BIOS dump. Generate a SHA-1 hash and compare it with the known-good values referenced in the PCSX2 documentation. If it doesn’t match, the dump is damaged — dump again, ideally with a different USB drive.
Issue 3 of 6
Game Boots to a Black Screen
A black screen means the emulator is running but nothing is displayed. The cause can sit in several places:
- Game compatibility: check the game’s status in the official PCSX2 compatibility list. Some titles need specific settings, and a small number have known issues.
- Graphics configuration: upscaling and enhancement settings can cause display problems in certain games. Reset graphics settings to defaults, or set internal resolution to native, and test again.
- Renderer issue: PCSX2 offers several renderers — Automatic, Direct3D 12, Direct3D 11, Vulkan, OpenGL and Software. Try switching renderers. Updating your graphics drivers often helps.
- BIOS / game configuration: if you’re using a BIOS from a different region than the game, try a matching-region BIOS. Also try disabling Fast Boot so the game starts through the full BIOS sequence.
- Corrupted game image: a damaged or incomplete ISO can freeze or show a black screen. Re-create the image from your own disc and verify it if a checksum is available.
Quick test: the Software renderer
If the game displays with the Software renderer, the problem is with hardware rendering or your GPU drivers — not the BIOS.
Issue 4 of 6
Game Runs Slowly or Stutters
It’s important to separate BIOS problems from emulator performance problems, because they’re rarely the same thing.
Rarely the cause
BIOS-related issues
Usually about booting or behavior: the game won’t start, the language is wrong, or saves behave oddly. A correctly dumped BIOS doesn’t meaningfully affect frame rate.
Far more common
Emulator performance issues
Resolution, renderer, shader compilation, hardware limits and accuracy settings. Check the list below.
50 FPS on PAL games is normal
PAL games are designed for 50 Hz, so they naturally run at up to 50 FPS rather than 60. That’s normal, not a slowdown.
- Internal resolution: higher resolutions demand much more GPU power. Drop to 2x or native and test again.
- Renderer: Vulkan or Direct3D 12 often perform better than OpenGL on modern hardware.
- Shader compilation stutter: brief hitches when new effects appear are common the first time you play, and usually settle as the shader cache builds.
- Hardware limits: PS2 emulation is CPU-intensive. Close background apps and make sure laptops are plugged in and running in a high-performance power mode.
- Accuracy settings: options such as higher blending accuracy improve visuals but cost performance. Return to defaults if you’ve changed them.
Issue 5 of 6
Controller Is Not Working
If your gamepad doesn’t respond, check these in order:
- Controller connection. Confirm your operating system recognizes the controller first. For Bluetooth controllers, re-pair if necessary.
- Input source. The current PCSX2 documentation recommends SDL as the preferred cross-platform input source. Make sure SDL input is enabled in the controller settings.
- Button mapping. Open Controller Settings, select Port 1, and use the automatic mapping option to assign your gamepad to the virtual DualShock 2.
- DualShock / DualSense controllers. PlayStation controllers such as the DualShock 4 and DualSense generally work through SDL. If buttons are doubled or misbehave, check whether another program (such as Steam Input) is also intercepting the controller.
Issue 6 of 6
Configuration Resets or Won’t Save
If PCSX2 forgets your BIOS selection or settings, it’s usually saving them somewhere unexpected. Check these:
- Installed vs portable: each version stores its settings in a different place, so switching between them looks like a reset.
- Write permission: make sure PCSX2 can write to its data folder — the same security and sandbox issues from Issue 1 apply.
- One version at a time: avoid running multiple PCSX2 versions side by side.
Still stuck?
Check PCSX2’s log output for error messages, then ask on the official PCSX2 forums or Discord. Include your PCSX2 version, operating system, BIOS region and the exact error.
🎨 Graphics Settings
PS2 BIOS and PCSX2 Graphics Configuration
Once your BIOS is working, graphics settings have the biggest effect on how your games look and run. It helps to keep the two roles separate.
Console environment
The BIOS
Provides the PS2 console environment: boot, region, system settings and saves.
How it’s drawn
Graphics settings
Decide how that environment is drawn on your screen: renderer, resolution and effects.
Don’t mix up the two
Changing your BIOS won’t fix a rendering problem, and changing your renderer won’t fix a BIOS problem.
Choosing a Graphics API (Renderer)
PCSX2 lets you choose a graphics API — the technology it uses to talk to your GPU. Most options are hardware renderers, which use your graphics card. The software renderer uses your CPU instead.
Recommended
All platforms
Automatic
PCSX2 picks the renderer it considers best for your GPU and operating system. The current PCSX2 documentation recommends Automatic if you’re unsure, and it’s the right starting point for most users. On macOS, PCSX2 uses Metal, Apple’s graphics API.
Only switch away if you have a specific problem — a black screen, graphical glitches or poor performance — and want to test another renderer.
Best for: Most users — the recommended default.
Windows · Linux
Vulkan
A modern, cross-platform API that typically performs well on current GPUs from all major vendors, and is often the best choice on Linux.
Vulkan compiles shaders as effects appear, so you may notice brief stutters the first time you play. These usually fade as PCSX2 builds its shader cache.
Best for: Modern GPUs and Linux users.
Windows · Linux
OpenGL
An older cross-platform API. PCSX2 still supports it and it can be accurate in some cases, but on many modern systems it’s slower than Vulkan or Direct3D and more dependent on driver quality.
Best for: A fallback when another renderer has problems with a specific game or driver.
Windows
Direct3D 11
Microsoft’s long-established graphics API. Mature, widely supported and stable across a broad range of hardware, including older and integrated GPUs.
If you see glitches or crashes with newer APIs on Windows, it’s a solid, reliable option to test.
Best for: Stability, older or integrated GPUs.
Windows
Direct3D 12
Microsoft’s newer API. It gives applications lower-level GPU access, which can reduce CPU overhead and improve performance on modern hardware.
Results vary by GPU and driver, so compare it with Vulkan and Direct3D 11 on your own system rather than assuming one is always faster.
Best for: Modern GPUs, lower CPU overhead.
All platforms · CPU
Software Rendering
Draws graphics on your CPU instead of the GPU. It’s much slower and runs at native PS2 resolution, but it can reproduce certain effects that hardware renderers struggle with.
It’s also an excellent diagnostic tool: if a black screen or glitch disappears in software mode, the problem is with hardware rendering or GPU drivers — not the BIOS or game image.
Best for: Accuracy edge cases and troubleshooting.
Switch mid-game with a hotkey
PCSX2 offers a hotkey to switch between hardware and software rendering while playing — useful for scenes that only glitch briefly.
Renderer Comparison
| Renderer | Platforms | Best for |
|---|---|---|
| Automatic | All | Most users; the recommended default |
| Vulkan | Windows, Linux | Modern GPUs, Linux users |
| OpenGL | Windows, Linux | Fallback for specific games or drivers |
| Direct3D 11 | Windows | Stability, older or integrated GPUs |
| Direct3D 12 | Windows | Modern GPUs, lower CPU overhead |
| Software | All | Accuracy edge cases and troubleshooting |
Quick rule
Start on Automatic, switch renderers only to solve a specific problem, and use the software renderer to find out whether an issue is graphics-related at all.
📖 Glossary
PS2 Emulation Terms Explained: BIOS, Firmware, ROM and ISO
PS2 emulation guides throw around terms like BIOS, firmware, ROM and ISO as if everyone already knows the difference. Many beginners don’t, and mixing them up causes a lot of setup problems. Here’s what each term actually means.
Quick Glossary
| Term | Meaning |
|---|---|
| BIOS | Console firmware / system software |
| Firmware | Software embedded in hardware |
| ROM | General term for read-only data / storage |
| ISO | Disc image |
| Emulator | Software that reproduces another system’s behavior |
| BIOS dump | Copy of BIOS data obtained from a console |
BIOS vs Firmware
The broad category
Firmware
Software built into a hardware device to control how it works. Your router, TV, phone and game controllers all run firmware.
A specific type
BIOS
On the PlayStation 2, the BIOS is the system software that initializes the hardware, runs the main menu, manages memory cards and controllers, and launches games.
In one line
Every PS2 BIOS is firmware, but not all firmware is a BIOS. The PS2 also contains other firmware components, such as the code running on its disc drive controller.
What “ROM” Really Means
ROM stands for read-only memory — storage that holds data permanently and isn’t meant to be rewritten during normal use. The PS2’s BIOS is stored on a ROM chip, which is why BIOS files are sometimes called “BIOS ROMs” and why dump files use names like .rom0 and .rom1.
The confusion comes from emulation slang. In the cartridge era, games themselves were stored on ROM chips, so “ROM” became shorthand for any game file.
Clearer wording for PS2
Say BIOS for the firmware and game image for the game.
ISO and Other Game Images
An ISO is a disc image: a single file containing an exact copy of the data on an optical disc. PCSX2 also supports other image formats:
Disc image
ISO
An exact copy of one PS2 game disc in a single file — typically several gigabytes.
Compressed · lossless
CHD
A compressed format that saves space without losing data.
Compressed
CSO
Another compressed image format that PCSX2 supports.
A game image is not a BIOS
Whatever the format, a game image contains only the game — not the console’s system software. That’s why you still need a BIOS.
Emulator
An emulator is software that reproduces another system’s behavior on different hardware. PCSX2 recreates the PS2’s CPU, GPU, sound and input hardware so your PC, Mac or Linux machine can act like a PlayStation 2.
What an emulator doesn’t include
It doesn’t provide the copyrighted system software — which is why PCSX2 needs a BIOS from a real console.
BIOS Dump
A BIOS dump is a copy of the BIOS data read directly from a physical console using a dumping tool. A complete dump can include several files, such as the main BIOS image plus companion files like ROM1 and NVM, depending on the console model.
“Dump” describes where the file came from: your own hardware. That’s what separates it from a file downloaded from a third-party site.
How They All Fit Together
Think of it like a real PS2 sitting under your TV:
🎮 The console
Emulator
PCSX2 plays the role of the PS2 console itself.
💾 Built-in software
BIOS
The BIOS from your own dump is the system software built into that console.
💿 The disc
Game image
The ISO or other game image is the disc you put in the tray.
You need all three
The BIOS is a type of firmware, and it lives on a ROM chip. You need all three pieces — emulator, BIOS and game image — for a game to boot.
🧩 Compatibility
PS2 BIOS Compatibility
Compatibility is one of the most misunderstood parts of PS2 emulation. There’s no single “best” BIOS file that’s automatically ideal for every game. How well a game runs depends on three things working together:
1 · System software
The BIOS
And the console it came from — its region, version and system settings.
2 · Software
The emulator
PCSX2 and its settings — renderer, graphics options and game-specific fixes.
3 · The disc
The game
The title itself, including any known issues listed in the PCSX2 compatibility database.
Does Every PS2 BIOS Work With Every Game?
Not always — but a valid, complete BIOS dump will boot a large share of the PS2 library in PCSX2. Most compatibility problems come from the emulator side, such as graphics settings, renderer choice or game-specific issues listed in the PCSX2 compatibility database, rather than from the BIOS.
That said, the BIOS can still influence results in some cases. Its region, its version and the system settings it provides (like language) can affect how certain games behave.
Check it, but check it last
If a game misbehaves, the BIOS is worth checking — but it’s rarely the first suspect.
Does Region Affect Compatibility?
It can. On a real PS2, region lock means a console generally won’t boot discs from other regions. PCSX2 is more flexible and can often run games from other regions with a mismatched BIOS. Even so, differences can show up:
- Language: many multi-language PAL games read the system language from the BIOS.
- Timing: PAL games are built around 50 Hz, while NTSC games expect 60 Hz.
- Title-specific quirks: a small number of games may behave differently, or refuse to boot, without a matching regional BIOS.
Safest approach
Match the BIOS region to the game region when you can — especially if something doesn’t work as expected.
Does PS2 Model Matter?
Sometimes. Different PS2 models shipped with different BIOS versions, and very early firmware (such as that from the first Japanese consoles) is less commonly used for general emulation than later revisions. Later fat and slim model BIOS versions are generally the ones most users run without issues.
For most players, the model matters less than having a complete, verified dump. If you do run into a problem with one BIOS version, testing a dump from a different model or revision can help rule the BIOS in or out.
Playing PS1 games?
PCSX2 is designed for PS2 games. For original PlayStation (PS1) games, a dedicated PS1 emulator such as DuckStation generally gives better results.
Should You Keep Multiple BIOS Dumps?
If you have access to more than one console, yes — it’s a smart move. Keeping several dumps gives you:
- Region coverage for a mixed-region game library
- A fallback for troubleshooting when a game behaves oddly
- Preservation of each console’s firmware in case the hardware fails
How to organize them
Keep each dump’s files together, label folders clearly (for example by region and model), and store backups separately. PCSX2 can list multiple BIOS files from the same folder, and you can switch between them in its BIOS settings whenever you need to.
💻 All Platforms
PS2 BIOS for Different Platforms
Your BIOS dump works the same way on every platform — it’s the same firmware, whichever operating system you use. What changes is how the emulator is installed and where it looks for BIOS files. Emulator support changes quickly, so this section reflects current official sources rather than older guides.
Platforms at a Glance
| Platform | Official PCSX2? | Default BIOS folder |
|---|---|---|
| Windows | Yes — installer or portable | Documents\PCSX2\bios |
| macOS | Yes — uses Metal | ~/Library/Application Support/PCSX2/bios |
| Linux (AppImage) | Yes | ~/.config/PCSX2/bios |
| Linux (Flatpak) / Steam Deck | Yes — via Flathub | Inside the Flatpak sandbox (use “open folder”) |
| Android | No — separate projects | Depends on the app |
Stable vs Nightly Builds
The official PCSX2 documentation covers Windows, macOS and Linux, and offers two release channels on each:
Recommended
Tested releases
Stable
Thoroughly tested releases. This is the best choice for most users.
Development builds
Nightly
Frequent development builds with the latest fixes and features — which can also include new bugs.
Which one to pick
Start with Stable, and try Nightly only if a fix you need hasn’t reached a stable release yet.
Windows
Windows is PCSX2’s most widely used platform. Download it from pcsx2.net as an installer or a portable version. The portable version keeps settings, BIOS files and memory cards in one self-contained folder.
- Default BIOS folder:
Documents\PCSX2\bios - Renderers: Automatic, Direct3D 11, Direct3D 12, Vulkan, OpenGL and Software
Documents folder blocked?
If PCSX2 can’t read the Documents folder because of security settings, point it to a simple custom location such as C:\PCSX2\bios.
macOS
PCSX2 provides an official macOS build, which uses Metal for rendering. Check the current download page and system requirements for up-to-date details on supported macOS versions and Mac hardware before installing.
- Default BIOS folder:
~/Library/Application Support/PCSX2/bios
Can’t see the Library folder?
It’s hidden by default. In Finder, hold Option and open the Go menu to show it — or use the setup wizard’s option to open the BIOS folder directly.
Linux
PCSX2 is officially available for Linux as an AppImage and as a Flatpak on Flathub. Vulkan is usually the best-performing renderer on Linux.
- Default BIOS folder (AppImage):
~/.config/PCSX2/bios - Flatpak: stores data inside its own sandboxed app directory, so the path is different. Use the setup wizard’s “open folder” option to find the correct location.
Flatpak & Steam Deck: folder permissions
Flatpak versions may need permission to access folders outside their sandbox. If PCSX2 can’t see your BIOS folder, tools like Flatseal can grant that access. This also applies to the Steam Deck, which runs Linux and commonly uses the Flatpak version.
Android and Other Platforms
PCSX2 does not offer an official Android version. Android PS2 emulation comes from separate projects:
No longer updated
AetherSX2
A popular Android PS2 emulator, but its original developer ended the project and it no longer receives official updates.
Community patch
NetherSX2
A community-patched version of AetherSX2 that many Android users now run.
Newer · PCSX2-based
ARMSX2
A newer project built on the PCSX2 codebase for ARM devices.
Multi-platform
RetroArch
Offers a PS2 core on several platforms.
Same BIOS, different projects
All of these use the same BIOS dump from your console. Since they’re independent projects, check each one’s official page for current status, supported devices and setup instructions before installing.
❓ FAQ
PS2 BIOS FAQ
Quick answers to the questions people ask most about the PS2 BIOS, PCSX2 and BIOS dumps.
What is a PS2 BIOS?
A PS2 BIOS is the firmware built into every PlayStation 2 console. It initializes the hardware, runs the console’s main menu and system settings, manages memory cards and controllers, and launches games. Emulators such as PCSX2 need a copy of this firmware to reproduce the console’s system environment, because they emulate the hardware but don’t include Sony’s system software.
Why does PCSX2 require a BIOS?
PCSX2 recreates the PS2’s hardware in software, but games also depend on the console’s firmware for startup, memory card access, controller input and other system functions. That firmware is copyrighted by Sony, so PCSX2 can’t include it. The emulator loads your BIOS image instead, and it then behaves the way a real console would.
Can I use PCSX2 without a BIOS?
No. According to the current official PCSX2 documentation, PCSX2 cannot play games without a PS2 BIOS, and there’s no built-in bypass. Its Fast Boot option only skips the startup animation — the BIOS is still loaded and used. If you want to try PS2 emulation without a BIOS, the separate Play! emulator can run some games, with lower compatibility.
Where does a PS2 BIOS come from?
A PS2 BIOS comes from a physical PlayStation 2 console, where it’s stored on a ROM chip. The official PCSX2 documentation recommends dumping it from your own console using a BIOS dumper tool. Files offered on third-party download sites are unauthorized copies of Sony’s firmware, and they may also be incomplete, mislabeled or bundled with malware.
What is a BIOS dump?
A BIOS dump is a copy of the firmware read directly from a PS2 console using a dumping tool, usually run through homebrew and saved to a USB drive. A complete dump can include several files, such as the main BIOS image plus companion files like ROM1 and NVM, depending on the console model. You only need to dump once, then keep backups.
Does PS2 BIOS region matter?
It can. PCSX2 is often able to run games with a BIOS from a different region, but matching the BIOS region to the game region is the safest choice. A mismatch can cause language issues in multi-language PAL games, 50/60 Hz timing differences or occasional title-specific problems. If you play games from several regions, keep one BIOS per region and switch as needed.
What is SCPH?
SCPH is the prefix Sony used for PlayStation model numbers, such as SCPH-39001 or SCPH-70000. You’ll find it on the label on the bottom or back of your console. The first digits generally indicate the hardware generation, and the last digits usually indicate the market, such as -00 for Japan or -01 for North America. There are exceptions, so confirm your exact model with a reliable database.
What are ROM0 and ROM1?
ROM0 and ROM1 are files produced by a PS2 BIOS dump, each representing a different area of the console’s firmware. ROM0 is the main boot ROM containing the core BIOS, which PCSX2 requires. ROM1 holds additional firmware data, commonly associated with DVD playback on many models. Some consoles also produce ROM2 or EROM files. Keep all files from a dump together.
Why isn’t PCSX2 detecting my BIOS?
The most common causes are that PCSX2 is scanning a different folder, the files are still inside a ZIP archive, the file has a hidden extra extension, or the dump is incomplete. Open the BIOS folder from within PCSX2’s settings, place the files directly inside it, and click Refresh. If the file still doesn’t appear, verify the dump with a SHA-1 hash and re-dump if needed.
Can one BIOS work with multiple PS2 games?
Yes. You only need one BIOS to play many games, just like one real console plays many discs. A valid BIOS dump can run a large share of the PS2 library in PCSX2. For games from other regions, a matching regional BIOS may give more reliable results, so players with mixed-region libraries often keep more than one dump.
What is the difference between NTSC and PAL?
NTSC and PAL are analog TV standards that also define PS2 regions. NTSC, used in North America (NTSC-U) and Japan (NTSC-J), runs at 60 Hz and 480i. PAL, used in Europe, Australia and other markets, runs at 50 Hz and 576i. That’s why PAL games naturally run at up to 50 FPS. Consoles and games from each standard also have their own region locks.
How do I verify a BIOS dump?
Generate a SHA-1 hash of your BIOS file and compare it with the known-good values referenced in the official PCSX2 documentation. On Windows, use PowerShell’s Get-FileHash with SHA1. On macOS, use shasum -a 1, and on Linux, use sha1sum. Also check that the main BIOS image is about 4 MB. If the hash doesn’t match, dump again using a different USB drive.